Main

How-To Archives

July 7, 2005

Eye See

Speaking of soldering irons, the IEEE Spectrum website has an article on how to upgrade your cheap affordable DVD player and make it work like one costing thousands more. Before I get too far, note well that these modifications are not for you Sunday solderers out there. You must make potentially dangerous modifications to the power supply and other high voltage areas of the DVD player. Some of these areas can hold an electrical charge large enough to cause injury or death for months after the unit has been unplugged from the wall outlet. Hence, unless you know what you are doing, do not even think about trying to make these modifications. You have been warned. Proceed at your own risk. The door is a jar.

That said, the changes consist mostly of switching out cheap capacitors with high quality units. By making these changes, the author of the article says he obtained cleaner, better sound and truer image colors from his DVDs. These claims must be taken with a grain of salt since no double blind, scientifically controlled studies were done. He didn't even try to measure, using various calibrated test instruments, the alleged better sound and picture. But if you really like modding stuff, and are qualified to make these changes, this could be your cup of tea.

WhyFi

The Popular Science website has a how-to article on assembling your own portable WiFi hotspot.WiFi in a backpack. 
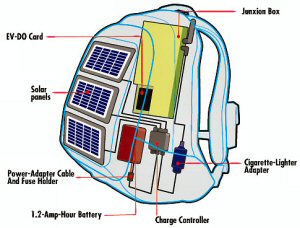
Everything fits neatly into the backpack but, my goodness, the equipment sure is expensive. The parts list includes a wireless gateway costing $700USD and a backpack going for $230. Surely, there are people out there who can do better?

While buying equipment off-the-shelf is a quick way of reaching your goal, I like to think there are electronic geeks experts out there who can come up with home brew equipment that will work as well, if not better, at a lot lower cost.

September 21, 2005

Linux Lumps

I have two problems to report in using Linux.

The first involved printing an Adobe Acrobat file. The file began as a WordPerfect file emailed to me from another worker. The file was then forwarded to another person who, I believe, inserted an image of their signature into the file, converted it into an Acrobat file and emailed that back to me.

Although the file displays fine, printing it results in a series of boxes, rather than text. I've tried various printer drivers but the problem may be in the Adobe Acrobat fonts. If so, as far as I know, there's not a whole lot I can do. So I booted into Windows and printed the file there. Otherwise, other Acrobat files seem to print fine.

As an aside, when installing the printer, Xandros indicated the "hpoj" driver would be a better fit than the HP 2200 that was the default for my HP LaserJet 2200d. However, nowhere did it say how to install this driver. In order to do so, you have to use Xandros Network to search for the hpoj driver. Once found, install it. Once installed, you have to run, at the command line, the following:

/etc/init.d/hpoj setup

The command line install will then ask you a bunch of questions, the answers of which depends on how your system is configured. Once done with the command line setup, you then have to go to Launch -> Control Center -> Peripheral Devices -> Printers -> Add -> Local Printer. The wizard continues but what you need to do is add the hpoj driver. Unfortunately, it didn't solve the problem with the Acrobat file but at least I have the hpoj loaded. But I digress.

The second problem is using my scanner. I have a Visioneer OneTouch 9120 USB scanner. However, there does not appear to be a Linux driver for this scanner. I checked out the SANE scanner site and found Visioneer is not supported. I checking other sites and it appears that it comes down to I am out of luck and should instead buy an Epson, almost any Epson. The moral of this story is check the SANE project site first before buying a scanner for Linux.

As another aside, I am using HTML-Kit, an HTML editor running under CodeWeavers/Wine. Unfortunately, HTML-Kit is not a supported application and routinely blows up. That said, it appears better suited for how I create my daily posts than any other HTML editor I've tried. All I need is something to create the post and then check for HTML syntax errors. That it does well. The spell checker also works, but that is a bonus because all I want is something to check my short posts, not something to create a multi-page site or something that gets in the way by creating crufty, non-standards compliant HTML.

In any case, I'm still here and still using Xandros Linux. But I have to switch over to Windows every once in awhile when I find problems like the two above.

Aloha!

September 27, 2005

NCPFS chgpwd

As I've noted before, my remaining problem with using Linux in a Novell Netware 4.x environment was changing my Netware password. You may remember that I'm using the NCPFS utilities to login to our Netware server and mount the volumes I am authorized to access. This mini how-to assumes you have successfully been able to get logged in and have mounted said volumes.

The NCPFS utilities (as of this writing I am using version 2.2.6) include, among other things, something called nwpasswd that provides a way to change your Netware password. However, partly due to a sketchy MAN page/example and partly due to my lack of understanding of how Netware logins work I have not been able to get nwpasswd to run error free. The error I keep getting refers to an unknown server error (0x89F0). I tried Googling for reasons why I would get this error and found one site that said nwpasswd doesn't work if the server is on a different sub-net from the client that is trying to login. I believe this is the situation on our network so this may be why I can't use this utility. If you can get it to work, great. If not, you may want to read on.

In searching for another utility, I found that NCPFS also includes, but does not install by default, a program called chgpwd. It is located in the /contrib/tcl-utils directory of the default NCPFS 2.2.6 install. I don't know why there would be two NCPFS utilities to change passwords but there you go.

However, under the default Xandros distribution, I couldn't find this utility nor even the directory it's supposed to be in (perhaps because NCPFS was installed using Xandros Network). So I downloaded the full NCPFS 2.2.6 package, untared it, changed into the NCPFS-2.2.6 directory that was automatically created, did a ./configure, make, make install-dev, changed into the /ncpfs-2.2.6/contrib/tcl-utils directory and then did a make chgpwd. Two notes: I did not do a make install in the /ncpfs-2.2.6 directory because I did not want to run the chance of installing a new version of NCPFS over the one already installed by Xandros Network since this could break something that wasn't broken. The second note is I did try to make install chgpwd, but got an error saying the default install directory for chgpwd existed but was not a directory (!?!?!). So, I just left the newly created binary in the /ncpfs-2.2.6/contrib/tcl-utils directory where it was.

At that point, I tried using the chgpwd utility and ran into problems because, now wait for it, the sketchy documentation. All I can say is you have to try the various options (taking care to observe upper and lower case) to see what works for your network. For mine, I needed the -S server name, -c context_name, -o object name, and of course, -P old password and -n new password. Note: if you use the -S server option, do not also use the -T tree option. One or the other, but not both.

For the record, using chgpwd would look something like this for our network:

./chgpwd -S DOWNING -o BOND -c AREA51.MI6.UK -P james -n moneypenny

Where DOWNING is the server name, BOND is the user name used to login to the Netware server, AREA51.MI6.UK is the context on the NDS tree for the object BOND, james is the current password and moneypenny is the new one.

Be aware that this utility does not give you any feedback unless something goes wrong. YMMV. Insert disclaimer here.

October 7, 2005

Blue View

I'm working on finding a Linux friendly HTML editor. Although I have HTML-Kit running under Wine, I would like to find something native to Linux. Currently, I'm looking at BlueFish and N|vu.

Before I get to those two, a digression. I installed the W3C's Amaya editor but found the UI less than user friendly. In fact, the entire application looked like it had been designed by a committee (as in a camel is a horse designed by a committee). Even though its been around since 1996 (the Palaeozoc era in web years), it just doesn't work for me.

I then tried installing Quanta Plus. Unfortunately, Xandros Network said the packages were "broken." So, I tried installing it from the source. After unpacking the download file and running ./configure, I got the first of several errors. The first was libjpeg was missing. I used Xandros Network to install that. But when I ran ./configure again, it said I was now missing libxml. Okay, back to Xandros Network and I installed that and re-ran ./configure. But now it said I was missing Qt. This went through two more iterations: KDE headers and libslt. After installing those packages, the ./configure script ran to completion without errors. But when I ran "make", it ended with three Type 1 errors and one type 2 error. At that point, I decided it wasn't worth my time and deleted Quanta Plus.

Back to the two I did get installed. Both N|vu and BlueFish seem okay, but it will take awhile before I feel comfortable in either. In addition, there is a bug in BlueFish 1.0-0.1 whereby if I try to run the spell checker it will segfault every time. That said, BlueFish seems more polished then N|vu. However, this may be more a comment on the state of Linux applications and the reason why more people don't switch to Linux than a comment on this particular application.

In any case, if you have a favorite Linux-based HTML editor, leave a comment so I can take a look. Thanks in advance.

Have a Great Weekend, Everyone - Aloha!

October 20, 2005

Reading UDF CD-RW in Xandros Linux

I wrote earlier about problems with the Linux UDF driver. This driver is used to access DVD-RWs and CD-RWs that are formated in Windows using, for example, Roxio or Adaptec's UDF drivers for multiple read/write operations. In other words, the disc has been formated in Windows to operate like a very, very large floppy. So, you can read, write, add, delete, edit and just about do everything you could do with a floppy disc.

At first, I thought I had to either re-compile the kernel, upgrade to the 2.6.11-1x kernel (see more below), or just forget about ever accessing the gigabytes of backed up data that I created while using Windows and wrote to CD-RW discs. But this is not the case.

By reading the CD-ROM How-To and especially the linux.faqts article on Linux: UDF: Windows Roxio I am now able to at least read my CD-RW backup discs. I can't write to them, but I can at least read them.

Here's what I had to do in Xandros Linux. I emphasize that the commands below may be specific to Xandros and you may need to use something else.

First, I needed to create a directory to mount the CD-RW to. To do this, I began by opening a console window to get to the command line. Note, you could do a lot of what needs to be done from within KDE or Gnome but it's easier to go to the command line. You need to be root when issuing these changes so you may was well as type in, su, hit the enter key, and then type in the password for root (if you didn't log in as root, which as a security precaution you shouldn't be doing) now. Then type in mkdir /mnt/cdrw and hit the enter key. Note, what you call the directory you are creating is up to you, as long as it isn't already being used or is a system reserved word. Otherwise, you can call it whatever you want.

The second thing to do is load the UDF driver. You do this by typing modprobe udf and hitting the enter key. To confirm whether the driver loaded, you can type in cat /proc/filesystems and hit enter. This should list a load of drivers, one of which should be udf.

Lastly, you need to mount the CD-RW by typing in mount -t udf -o ro /dev/cdrom /mnt/cdrw and hit the enter key. If all went well, you can now change to the directory /mnt/cdrw and browse the files on your CD. Note, the part of the command -o ro sets the system to read only. You can change it to -o rw but so far, when I do, I get the following message:mount: block device /dev/cdrom is write protected, mounting read-only. I need to figure out why this is happening and what, if anything, I can do about it. The how-tos are kind of vague about this and say you may or may not be able to get this to work.

Before removing the disc, you should probably unmount it by typing the command umount -a -t udf.Once unmounted, feel free to eject the disc.

In any case, I now have read access to the data, even if it's not as functional as in Windows. Oh, one other thing, Windows long file names may be displayed as a truncated 8.3 name. There is apparently a way of enabling long file name support but I haven't found out how to do that yet.

Now, in my earlier post, I had talked about upgrading to the 2.6.11 kernel. I thought I would have to download the more than 30MBs of source code and compile it myself. This was based on my search of the Xandros Network repository using the search term kernel. This search turned up only the source code. Little did I know I needed to search on xandros-kernel to find the 2.6.11 kernel image. Once I found that, installing the new kernel was just a matter of clicking on the install link and Bob's your Uncle, I had the 2.6.11 kernel installed. How cool is that?

Now if I could only get write access to the drive...YMMV. Use at your own risk. Insert disclaimer here.

[UPDATE] I need to add instructions for DVDs. As you might expect, they are very simialr to CD-RW so I won't go into an explanation:

mkdir /mnt/dvdrw
modprobe udf
mount -t udf -o ro /dev/dvd /mnt/dvdrw
umount -a -t udf

Aloha!

November 2, 2005

Using Perl to Display a File Creation Date

Getting back to my post on displaying the file creation date and time, a couple of readers have sent in helpful suggestions. Before I get to one, let me briefly recap what I am trying to do.

Via a security webcam/server at home, I periodically ftp an image to my website, seto.org. A web page I've created then displays the image. Every once in awhile, I check the web page to see what's going on at home. But want I wanted was a way of time stamping the image so I would know when it was taken. I found that a Linux program called Stamp! would do that. Sort of. What Stamp! does is uses the current system time and overlays the image with that. This causes a problem for me in that Stamp! may be updating even if the webcam is turned off. This means the image that is sitting on seto.org could be several hours old, but by just viewing the web page, you would have very little, if any way of knowing this.

So I searched for a program that would overlay the test.jpg file with the file's creation date and time. I have been unsuccessful in finding such a program. So, I tried finding some Perl script that would at least read the creation date and time of test.jpg and then insert/output the result into the web page that also displays the image.

By searching the web, I found a code snippet that supposedly reads the file date and time but ran into problems. Which is where we left off.

A reader by the name of Peter, sorry I don't have is last name so I can't give him full credit but he knows who he is, suggested the following:

#!/usr/bin/perl
use File::stat;
use Time::localtime;
$file='/path/to/test.jpg';
$date_string = ctime(stat($file)->mtime);
print "file $file updated at $date_string\n";

Making this executable and running this from the command line displays the wanted date and time of the file. Now I could use some help in figuring out how to display this information in a web page that also displays the test.jpg file so that, using a web browser, I can see the test.jpg image and the date and time of the test.jpg file (If this information can be overlayed on the test.jpg itself like Stamp! does would be a bonus but I don't know of any programs that will do that. So, just displaying the date and time of the file in HTML would be better than what I have now.).

The present web page code itself is below:

<!DOCTYPE HTML PUBLIC "-//W3C//DTD HTML 4.01 Transitional//EN">
<html>
<head>
<title>Seto.org Upstairs</title>
<meta http-equiv="refresh" content="60">
</head>
<body>
<img src="/path/to/test.jpg" width="640" height="480" alt="
Upstairs Web Cam."> 
<p>Refreshes automatically every 60 seconds.</p>
</body>
</html>

A big thank you to Peter and to fellow Daynoter John Dominik who suggested a different way of doing it.

Aloha!

November 3, 2005

Using PHP to Display a File Date

Thank you to everyone who has sent in suggestions on how to solve my problem of time stamping a jpeg or html file. I now have more suggestions than I could possibly test in a week. I will post solutions as I can find the time to do so.

So far, one suggestion that works is from Rick Hellewell:

<?php
// outputs e.g. somefile.txt was last modified: December 29 2002 22:16:23.
$filename = 'somefile.txt';
if (file_exists($filename))
{
echo "$filename was last modified: " . date ("F d Y H:i:s.", filemtime($filename));
}
?>

I believe it assumes that the 'somefile.txt' is in the current directory (the directory that the current PHP page is in). I got it from the PHP pages here: http://us3.php.net/manual/en/function.filemtime.php. And the extension of the web page needs to be PHP. ...Rick...

You insert the the above code into a web page anywhere between the <body> </body>tags, make sure the name of the web page has the .php extension and, assuming your web server is setup to use PHP, Bob's your Uncle, it works!

But for now, thank you to Peter Thomas, fellow Daynoters Rick Hellewell and John Domonik, and Frank Fitz for sending in suggestions/examples. I will get to each as soon as I can. If I missed anyone I apologize, it was purely unintentional.

Aloha!

November 9, 2005

Installing faad2/m4a/AAC Support in Xandros Deluxe 3.01

UPDATE: Follow this link to a site that has a Debian specific source code for the faad2 xmms plug-in. You still have to compile the stuff but the revised scripts do most everything for you. Just remember, when you do the configure, to type in ./configure --with-xmms --with-mp4v2. Note, the server is behind a dyndns proxy. Use at your own risk. YMMV. Insert disclaimer here. END OF UPDATE

DaveSource.com has a good page on installing faad2 and the xmms plug-ins in Debian. I've modified the instructions to work with Xandros Deluxe 3.01. Why would you need such things? Well, if you have a library of non-DRM m4a or AAC audio files, the only way, by default, to play them on Xandros Deluxe 3.01 is by using Xine or the evil RealPlayer 10. Although RealPlayer works okay, it and Xine are fine for video, for which they are designed, but they are not the best for listening to audio.

What is needed, as far as I am concerned, is something like the ubiquitous WinAmp for Windows. As it so happens, Xandros allows you to install an application called xmms, via Xandros Network, that is very similar to WinAmp. But, and here's the catch, you have to add support for m4a/AAC yourself. Whether you want to spend the time doing this only you can decide. If you are happy with Xine, RealAudio, or something else, fine. But if you want to use xmms under Xandros to listen to m4a/ACC files, then read on.

Getting this support installed on Xandros is a challenge because, it seems, you can't just install the software directly via Xandros Network. Before I get any further, please go to the DaveSource site and read the instructions there (keep your browser open on the site so that you can refer to the instructions and also download the required patch file). Once you understand the instructions, know that you need to modify these instructions to work with Xandros Deluxe 3.01. What I have below are changes to the instructions that by trial and error I found to work. YMMV. Use at your own risk. Insert disclaimer here. Note, this plug-in cannot play encrypted files so don't even ask.

  1. If you have not yet installed, via Xandros Network, the C/C++ Development Tools and automake1.9 (or later) and any other development tools/libraries that may be needed, like GTK, do so now. Xandros does not install a development environment because they don't want you to compile your own applications. While it is not impossible to do so, I wish Xandros wouldn't make it so difficult. In any case, this is not a tutorial on creating a development environment in Xandros so you are on your own.

  2. Install, via Xandros Network, something called libtool.

  3. Install libid3-dev (I have no idea if this is needed but I installed it using the instructions).

  4. Download the faad2 file from AudioCoding.com. Make sure you get the .tar file and not the .zip (which is intended for Windows users).

  5. Create a faad2 directory by typing mkdir faad2

  6. Unpack the faad2-2.0.tar file that you down loaded from AudioCoding.com by typing in tar -xvf faad2-2.0.tar (Or whichever version you down loaded. Again, do not download the zip file version as it is intended for Windows users and will not work in Linux. Note also that if you try using the Xandros File Manager, instead of unpacking the file via the command line, this may result in errors. So don't blame me if you use the File Manager and run into problems.

  7. After unpacking the files, change into the faad2 directory by typing cd faad2

  8. Once there, the instructions say to edit configure.in by adding AC_PREREQ(2.50). It didn't seem to matter in Xandros whether I did. I'll let you decide if you want to edit configure.in. Whichever works for you. I didn't.

  9. Next, edit the Makefile.am file by deleting the lines referring to rpm: (see the DaveSource instructions). If you forget to do this, you will get a "Makefile:623 missing separator. Stop." error when you run make.

  10. Another thing that didn't seem to matter is how you run the commands in the file named bootstrap. That is, manually, as the instructions say to do or by typing in autoreconf -vif. I used autoreconf -vif although you can do them whichever way that works. Note, you may need to change permissions on bootstrap to make it executable. Or not. It depends.

  11. As root, follow the instructions about typing in ./configure --with-xmms --with-mp4v2

  12. Then, type in make

  13. And finally type in make install

  14. faad2 is now, or should be, installed. If not, make clean, then delete everything in the faad2 directory and start over. Keep trying different variations until you get it installed without error.

  15. Having done all that, you are now are ready to create the xmms plug-in by changing directories by typing cd plug-ins/xmms/src

  16. I think you can ignore the instructions about downloading the makefile.manual file. I didn't need it and you probably won't either. In fact, trying to run the file may lead to problems. But, for now, I would just ignore them and only follow the instructions if you end up with other problems later

  17. Continuing with the instructions, download the libmp4.c patch file from the davesource site.

  18. Once the file is down loaded, type in patch < libmp4.c.patch I don't know if this step is still needed but I did it.

  19. Finally, read and follow the instructions in the INSTALL file in the /faad2/plugins/xmms/src/ directory to complete the installation. If you get errors, start over and try different variations like manually doing the make and make install or doing the makefile.manual file.

If all went well, start xmms and check that the plug-in is listed and enabled. If so, you will now be able to play plain, unencrypted m4a/AAC files.

Thank you to the davesource site for creating the how-to and a big onion to Xandros for not including m4a/AAC support natively.

Aloha!

November 22, 2005

Sounding Off2: faad2 and xmms2

It's a very rainy day here in paradise. The humidity is at 100 percent and the window panes are covered with condensation that glitters like icicles as the water drips down. I think you can guess that not much is happening here today. Although, I did have a little problem yesterday with the program I use to listen to music. It's called xmms. It stopped playing anything except MP3s. I don't know why. All the plug-ins where still there and enabled. So I uninstalled and reinstalled the program. No difference. So I tried re-compiling the faad2 xmms plug-in again but had no luck. Sigh. So, I uninstalled again, deleted the .xmms file in ~/home, reinstalled, and Bob's your slave, it's working again.

Speaking of recompiling the faad2 xmms plug-in, I found a new source (pun intended) of where to get the code. The xmixahlx site has the source code specifically setup for Debian installations. You still have to compile everything, but at least you don't have to go through any Debian specific incantations. Just follow the default instructions, including ./configure --with-xmms --with-mp4v2 and the scripts do everything for you, including copying the plug-in to the correct directory. Pretty slick.

Of course, the site is located behind a dyndns dynamic DNS service so who knows how reliable/secure a site this is. YMMV. Use at your own risk. Insert disclaimer here.

Aloha!

December 15, 2005

Moto4Lin: Linux/Motorola V3 Connection

Yesterday I talked about the Motorola V3c I got for SWMBO. If you want to access the phone, via Linux, you may or may not be able to use the application called Moto4Lin (link to the Moto4Lin site for info and download the application from KDE-Apps here) .

I say may be able to use Moto4Lin because, as with most Linux applications that you have to compile yourself, you have to have the correct libraries, compiler environment, and in this instance, kernel module.

The libraries you need are libqt3, libusb-dev, and zlib. I won't go into the compiler environment because it varies so much by distribution. You also, according to the documentation, need a kernel module called the USB Abstract Control Model (ACM). Where you get that and how you install it I haven't figure out yet. [UPDATE: See below]

In using Xandros Deluxe 3.01, I was able to install the required libraries and then at the command line change into the directory where I unzipped the downloaded file and, as root, type in qmake [enter]. Then type in make [enter]. And finally type in make install [enter].

The instructions also say to type in the following so that you can run the program as yourself (as opposed to root):

chown root /usr/bin/moto4lin [enter]
chmod u+s /usr/bin/moto4lin [enter]

So, I now have the Moto4Lin application running but I can't connect to the phone.

When/if I can find this ACM module and get it working maybe things will work. Or not. You never no with Linux. But I'll keep you updated as things go forward.

Speaking of updates, I tried viewing the internal display screen of SWMBO's Motorola V3c outdoors yesterday and it has the same problem as my V3. Namely, the screen washes out and you can't see what is being displayed. Oh well, maybe in the next version of the V3 they'll get that solved.

UPDATE: Okay, apparently the module loads automajically but it is in a location different from the default that Moto4Lin looks for it. I will lay out two methods of how to get things going on a Motorola V3 from Cingular Wireless.

  1. Plug in the phone to your mini-USB cable and then plug the cable into your PC's USB port.

  2. At the command line, type: echo AT+MODE=8 > /dev/ttyACM0 [enter][note: the ttyACM0 part has the number zero at the end, not the letter O.]

  3. Still at the command line, start Moto4Lin by typing: moto4lin [enter]

  4. With Moto4Lin running, click on the "Connect/Disconnect" button.

  5. After a short wait, it should be connected. If successful, you then click on the "Update list" button.

  6. If that works, the Directory window should display "Phone", an icon, and the plus sign "+" next to the letter "a" to indicate you can open that directory. Do so.

  7. This should lead to a "mobile" directory. Expand that directory and you will be viewing the root folders of your phone. Done.

Now, if at step four above you don't get connected, you may have to click on the "Preferences" button and edit the default connection directory from /dev/usb/acm to /dev/usb/tts/ . I had to do this and maybe this is specific to Xandros Deluxe 3.01 using the 2.6 kernel. I don't know. All I know is I had to do it otherwise I couldn't get connected. YMMV. Use at your own risk. Insert disclaimer here.

Screen shot of Moto4Lin.
Click on the image to see a larger version.

Aloha!

January 9, 2006

Oils Well That Ends Well

Do not try this at home. I repeat, do not try this at home. The folks over at Toms Hardware have a story on using eight gallons of cooking oil to act as a cooling medium for a PC.

Strange at it may seem, I seem to recall that oil is commonly used to cool high power electrical components. However, I have never heard of anyone using oil to cool a PC via immersion. That said, these people took the time to seal a case and make other needed changes to a motherboard and CPU and apparently ended up with a stable, completely quiet PC.

However, I'm not an electrical engineer and I have no idea whether this is safe to do so I'll say it once again, don't try this at home. YMMV. Insert disclaimer here.

Aloha!

February 1, 2006

Can You Hear Me Now?

Sometimes, I really hate computers (and the software that run on them). Both our mail server and voice mail server are acting up. Mail sent on Sunday did not show up until 7:45am Monday morning. Then access to voice mail, both my own and others, is random, at best. Sometimes there is a very loud, annoying beeping sound. Sometimes there is silence. And sometimes it works. We really do rely on both these systems and having both go down, at what seems like random intervals, is very frustrating.

Now magnify that by a thousand times because we are drafting testimony that is time sensitive and you have the makings of a system meltdown. Or at least a human ware meltdown. Sigh.

I don't know what operating system(s) or software these two systems use but it needs to be fixed. I contacted our Information Technology Division but they apprently don't know why it's happening nor did they suggest a solution.

The bottom line, I guess, for both problems is we are just supposed to live with it.

March 10, 2006

Linux Driver for HP2600n

One of the areas that Linux still lags behind Windows is in the support of peripherals. This may be because most drivers are written by the manufacturer of the peripheral and, over the years, most drivers were written for Windows. In addition, giving credit where due, Microsoft spent a lot of time and money on writing their own drivers and, perhaps more importantly, also made available to developers, kits to help them write their own.

Still, why don't more manufacturers support Linux?. Especially those who call themselves high technology companies. I mean, how much does it cost to write a driver relative to the revenues they can generate by selling their products (e.g., printers, scanners, keyboards, mice, graphics tablets, etc.) to Linux users?

For example, let's look at Hewlett Packard. Among other things, HP makes a line of laser printers. For many years, HP LaserJets were the standard in office laser printers. These printers were admired for their ability to just keep on running. They were even compared to military tanks in their ability to take abuse, but keep on running. Year after year.

But as the environment changed, and competition began to eat into profits, HP seemed to loose its way. It seemed to become stand-offish or haughty. That is, it began treating its customers like the enemy. Or at least marks to be fleeced.

Although change has come to HP (some would say change has been forced on it, but I digress), it still doesn't support Linux.

So, if you buy, for example, PC Magazine Editor's Choice HP 2600n, which is one of the cheaper color laser printers currently available, you shouldn't be surprised that HP doesn't include a driver for Linux.

I recently bought one of these printers. But since I use Linux, and this printer does not use Postscript or, for that matter, PCL, I had to find another solution.

Fortunately, a guy by the name of Rick Richardson has created a Linux driver for the HP2600n. As with many Linux drivers, you may run into problems getting it to work with your distribution.

But in using Xandros Deluxe 3.x, the only problem I had was having to configure CUPS to enable color printing (it printed fine in black and white but I couldn't seem to get it to print in color). Before you do the following, you must first install the driver as indicated on Rick's site. Only after you have done so, and you are otherwise printing with the driver, should you do the following (assuming you can print black and white but not color). Note that there may be other ways of doing the following. All I can say is it worked for me. YMMV. Use at your own risk. Insert disclaimer here:

1. Use your web browser to go to your CUPs config page by typing in the following: http://localhost:631/admin

2. Login as root and enter the password for the root user.

3. Across the top of the screen you should see a menu list like the following: Administration Classes Help Jobs Printers Software.

4. Click on Printers

5. Click on Configure Printer

6. Change the default to color mode and click on Continue.

7. Done.

If all went well, you should now be able to print in color. If not, sorry but you are on your own. You can contact Rick but before doing so, please contribute to his effort (I did) before emailing him. He deserves full credit for doing what HP should be, but isn't. Thanks Rick.

Have a Great Weekend, Everyone - Aloha!

February 14, 2007

Part 3 of Upgrading a Dell Inspiron 1150

This is part three of a four part (part 1, part 2, part 3, part 4) post on upgrading my Dell Inspiron 1150 laptop to get better performance out of the admittedly cheap affordable, bottom-of-the-line PC. In today's post, I will describe how to remove the old drive and install the new Hitachi Travelstar 7K100 7,200 rpm 2.5 inch drive.

Removing the hard drive requires removing two screws that hold the cover of the PCMCIA slot. Attached to the cover is the drive tray and drive itself. But first, remember to read and understand all directions posted in your manual. This includes removing the battery to reduce the possibility of electrical damage to existing components and properly grounding yourself before touching anything.

The drive slid out without problems but I noticed the connectors at the back of the drive was not the same as the new one! At this point, I panicked. Clearly, the new drive was not going to work. That is, until I took a close look at the old drive, which by the way is identified by Dell as an IBM but is actually also a Hitachi Travelstar, and noticed that there seemed to be an adapter. I was able to *_carefully_* pry one end of the adapter and then the other end and finally lift the adapter off of the old drive. I then removed the four screws holding the old drive to the drive tray and removed the old drive. Using the same screws and drive tray, I inserted the new drive and placed the adapter on the pins of the new drive. The drive and tray slid easily back into the laptop and I secured everything with the two screws removed earlier and replaced the battery.

With that, I was ready to boot up and insert the Windows Vista DVD. How that went is a post for another day. For now, I wanted to talk about a comment Sjon left regarding the old drive and when or if you should wipe it clean:

<snip>I would always first install and test the new drive before clearing the old one (I have had a couple of new drives fail on first booting).

He is right, I should have waited until the new drive was in and operational before wiping the old drive as anything can happen. As it turned out, had I had problems with the new drive, I still could have reinstalled the old one and used my backup CDs to reinstall the data. But that would have taken a lot more time and effort than just reinstalling the old drive. So I agree with Sjon that you should wait until the new drive is in before deleting anything. This, however, begs the question of how to wipe the drive once you are ready to do that. Read below for the solution.

But first, that does not mean you don't have to or should not do a backup of the drive before you remove it. I think for safety's sake, a good backup is the best way to go, along with not wiping the drive until later.

Now, I had actually thought about using my old drive in an external USB case as a kind of large portable floppy disk. But I thought that would be too expensive (I seemed to recall that the cost of external cases were in the $100USD range). So, at first, I didn't try this. But after getting Sjon's comment, and realizing it would be difficult to wipe the drive once I'd removed it without reinstalling it somehow. I looked into the actual cost and found one at CompUSA for about $20. This seemed reasonable to me so I got one. For $20, you should not expect much and not much is what you get. But it works.

So, what I could have done in the beginning was do a backup of all my data but not wipe the drive and instead install it in the external case. I then could have installed the new drive and then transfered the contents of the data partition to the new drive via USB, then wiped the drive. Of course, my old laptop doesn't have USB 2.0 so the transfer would be a little slow, but it would still be more convenient.

The bottom line so far is that the new drive and memory has really brought this old laptop back to life. Everything is faster now. For program loading, it is *_much_* faster. It used to take almost a minute for Firefox to load. Now it almost snaps instantaneously to the screen. Although the great majority of the speed increase is from the faster hard drive, adding the memory also helped.

The down side is that battery run time may go down since the new drive may be consuming more power. But even if this is true, and with advances in electronics and drive mechanisms it might not make that much of a difference, the speed increase is worth it to me. YMMV. Insert disclaimer here.

Part 4 will cover the installation of Microsoft Vista Home Basic and how to install the CompUSA external USB hard drive case. Stay tuned.

Aloha

February 15, 2007

Part 4 of Upgrading a Dell Inspiron 1150

This is part four of a four part post (part one, part two, and part three) on upgrading my old Dell Inspiron 1150. So far, I've replaced the 384MB of RAM with 1GB and replaced the slow 4,200rpm hard drive with a Hitachi Travelstar 7,200 unit.

Today I will talk about installing MS Vista Home Basic and the external USB 2.0 enclosure for the old hard drive. As posted earlier, I chose Vista Home Basic for several reasons. First, I have software the runs best/only in Windows. Secondly, Vista includes many bug and security fixes that may not be included in Windows XP. Although it probably adds some new ones, overall it should be more secure than XP. I chose Home Basic, rather than Premium/Business/Ultimate, because my laptop, with only 64MB of shared video memory, does not meet the minimum requirement of 128MB for Home Premium and above. I also hoped that it would be faster in booting and exiting than XP (which, as I've noted, took several minutes to boot and almost as long to exit).

So after installing the new drive I powered up, inserted the DVD, and let Windows install. It took about an hour and a half from start to finish (including installing several updates). The trickiest part was partitioning the new drive. Although the install process has a point at which you can do this, it is not well explained. How I used to do this was to boot off of a bootable floppy (i.e., it was formated and included command.com) that had DOS utility fdisk on it. I would use fdisk to create an active primary partition and then an extended partition, whereupon I would then set the logical drives C: and D:. The Vista install includes a button that allows you to create, extend, or remove partitions. But here, "extend" does not equate with "extended". As far as I can see, extend changes an existing partition's size. So what I ended up doing was creating two primary partitions, and installed Vista to the first primary partition. I then formated both (I'm not sure I needed to do that because, I assume, the install would have done that anyway).

I'm not going to spend any time on how it looks (a lot of eye candy, even without Aero) because I'm focused on speed improvements. But I will comment on one problem that has arisen.

I'm having problems with the DVD/CD-RW drive (a Samsung unit). The problem is intermittent reading of CDs. It doesn't matter if the CDs are ones I burned or original disks (I had problems with a CD from Microsoft that had the SR-1 for Office 2000 on it). Sometimes ejecting the disk and then putting it back in works. Sometimes multiple retries works. Sometimes opening a command prompt and using xcopy works. Sometimes nothing works. I'm not sure if its a problem with the driver (for now, I'm using the one that came with Vista rather than the one Dell has for XP) or what. All I know is it is very annoying.

But as to booting and exiting. For this configuration, booting and exiting, but especially exiting, seem much faster. Shutting down used to be a chore while the drive spun on and on. Now, it shuts down in a few seconds. This is much better. Now on to the external USB drive housing.

I bought the cheapest external housing I could find, a CompUSA unit. The purpose of the housing is so that I could make use of the old hard drive as sort of a high capacity floppy disk. That is, I could copy stuff to it to store or to carry to another PC. If I just wanted to place the drive in another PC, fellow Daynoter Sjon suggested getting a 2.5inch to 3.5inch adapter tray, which costs a lot less (about $10). But since I wanted to be make this drive mobile, I chose the external housing.

The housing is made out of aluminum and plastic. The upper and lower halves are aluminum while the center section, where the drive rests, is plastic. I say rests because I couldn't see any provision for screwing the drive down. Four screws are included for, I guess, this purpose but where you are supposed to use them I can't say. So, you lay the drive down onto the plastic tray while inserting the end with the interface pins into the corresponding connector. Then you replace the upper and lower halves and use some of the tiniest screws this side of a mechanical watch that you will ever see. Once closed up, there are two USB cables. One is for data and the other is for drives that require more power than is supplied by one USB connection. I seem to be okay with one cable but it all depends on the drive and, I guess, how much power the source USB connector can supply (I hear that some laptops and most external hubs don't provide enough power). In any case (pun intended), it all works and I now have the equivalent of a very high capacity floppy disk (with attached cables).

Overall, would I do anything different? Yes, as I noted in part three, I would keep the data on the old drive until the new drive was up and running. Otherwise, adding the memory and new drive have given new life to my old laptop. So much so that I will keep using it for at least a year or two (or until Apple upgrades its MacBooks to include a card slot).

Aloha

About How-To

This page contains an archive of all entries posted to Misc. Ramblings in the How-To category. They are listed from oldest to newest.

Grandson is the previous category.

Misc. is the next category.

Many more can be found on the main index page or by looking through the archives.

Creative Commons License
This weblog is licensed under a Creative Commons License.
Powered by
Movable Type 3.34